|
A car can be an attractive, elegant, and expensive addition to your home. However, there are certain precautions you need to take in order to maintain it well and make sure that the paint job doesn’t go off. Read on for a step-by-step guide on how to paint a car. How To Paint A Car Like A Pro Learn how to paint a car so it looks more expensive than it really is. Although some of these steps are specific to the vehicle, they still apply no matter what type your paint job might be; whether you're painting an entire car or just repairing scratches that look like swirls: 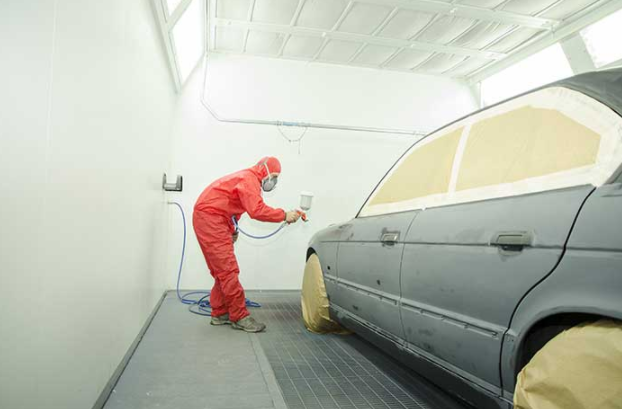 Masking The Area You’re About To Paint According to paintcentric at some point, you need to mask the area that is going on and off the paint. If it's a whole vehicle, make sure your painter locates all of the specific sections because he can't bring this color or texture into any particular place. Set up 2-inch wide tape squares at various spots around the car so that you have extra lengths leftover by cutting them in half. Ask your painter to put one on the hood, a couple of inches away from all edges. There will be other areas you need him to cut and do individual masking for as well. Prepare The Car’s Surface It's imperative that you prep the paint job carefully before beginning because it's so easy for mistakes then compound into frequent touch-ups if something goes wrong later. Undercoat every surface with a strong clear primer that can withstand chipping and peel for at least an hour or two (this allows you to paint over the primer if it doesn't turn out perfectly). Doing this will also help make sure that areas are still smooth even after painting them. Mask Off The Areas You Want To Paint Once your body is primed, start with painter’s tape and mask off on each side of all pieces/parts that need to be painted. Make sure to keep the edges straight and even so that the area looks uniform once you're done. Apply The Undercoat Once a base of primer has dried, use spray cans (they are specifically formulated for painting which contains more aniline dyes than paint from normal companies), medium-dark green in this case, and then apply it as opaquely as possible on every part - including all components inside/underneath your doors. Get the edges smooth, and then leave it to dry thoroughly. Mask The Next Step Once everything under has dried completely and no light pass through or spreads, start painting with a nice dark green color over your base coat - in this case, the hue is medium because darker doesn't work as well on these cars (light will probably blend right into that first layer if you do too much). You can see how light drips right in through the gaps. This is where those cracks are, so keep them still and high enough to not cause any danger however you do it our painter has a spray gun with an "air" gate that we use to shoot these flat layers on extremely fast from all edges at once in order to stay far away from dried paint lines (this also forces more even coats). Paint With Acrylic In Blending When painting thick and heavy like this, it's good to do it with acrylic that dries smooth and clean such as a "clear" (versus normal paint fast drying) - we found out after having thinned the layers several times. The motor vehicle painter at Competition Graphics recommended using a matte topcoat clear over our car because he uses gloss on other cars in the shop so why not? We also mix up thinner doses for faster dry times for smaller areas and use a finer tip for applying the darker areas which is more opaque but doesn't dry as fast - that's about it. You can easily spot where our mistakes have been made in these pics: car door gaps, bubbled paint on side panels, undercarriage, and roof (which has too much clear coat to blend) and finally, some spots we see are too big/dark when compared with other parts of car-like behind tank compartment, etc. Another Way of how To Paint A Car Like A Pro Step 1: kill the rust First off, you'll need some black Rustoleum paint (for any metal surface) if you don't want to live with rusted-out holes everywhere on your car. Go to the auto parts store or even home depot and ask them for Rustoleum spray paints in matte finish - they suggest using regular aerosol cans but we use a Craftsman spray gun with an air trigger so it goes faster without having to get up every 10 seconds to squeeze the trigger. Warning: We don't recommend using paint that resembles purple crayon colors due to it staining on surfaces, we tried them too and I came across a lot of issues repainting certain parts. Finally, when doing bumpers you can use any color but this has always been our overall preference: black! Step 2: Pre-clean the car before beginning painting You may choose to clean the car in the pre-cleaning process so you won't be struggling with dust and possibly other contaminants on your car after painting. Unlike using water, paint stripper comes up filthy stuff that will contaminate every part of your painted surface so before getting rid of any rusted parts use a solvent/varnish (like Clear Coat) remover - we've always used Turtlewax because it's reasonably cheap but there are better examples. Step 3: prepare paint mix Your paint/primer mixture will be a key aspect of the project so take your time and prepare it as per our video tutorial - In short, you have to mix 1 part black primer (let air dry in between layers) with 2 parts base coat color + some dust-free medium that can act as a thickener in order for it not to run on any surface when the paint dries curing. Step 4: Step by Step Assembly Start With Undercoating After mixing pour a thin layer of the color you are using on its surface and let it sit for at least 6 hours (10-12 is best but we went with simple to real fast) before doing any additional steps. You know when your paint has dried because it gets dull and rubbery/grippy instead of smooth. Now depending on how heavy you want your paint to be and the car's condition, use one or more of the following techniques complete wet sanding (visually removing all scratches), but we went easier approach with a few passes using steel wool only skipping mask-off process because there is little difference in the surface by painting at this point anyway. 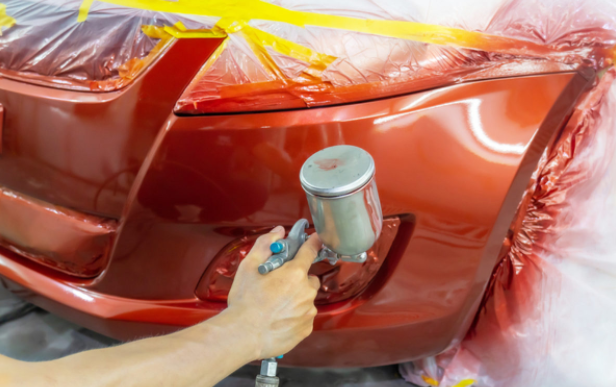 Conclusion
With the recent growth of auto-related products and services, it's no surprise that there are now several ways to paint a car. Whether you're looking for a quick touch-up or you want to invest in an entire paint job, there are plenty of options out there.
3 Comments
|
